Introduction
The Member List Manager is a program that allows you to manage lists of TVPBC members.
With this program, you can view the club's member directory and use it as the basis of generating sub-lists of members.
TVPBC Member List Manager Highlights
====================================
- Can load directly from the TVPBC website member directory, (or Pickleball Den™ DB extract)
- Supports Importing from Pickleball Den™
- Export to PDen that actually works
- Building member lists from scratch is much easier than PDen
- Able to export to other apps like Excel or Numbers
- Easy copying of multiple email addresses for composing emails
- Easier lookup of a member’s email address
- Powerful filtering capabilities
Opening Screen
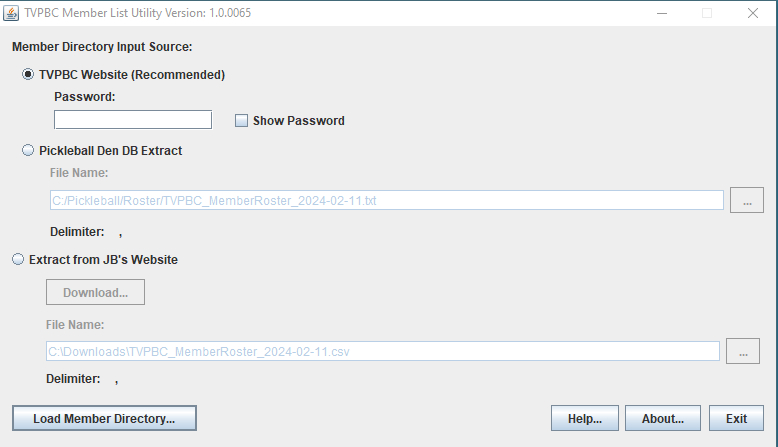
When you launch the program, you will be prompted to select the source of the TVPBC
member directory. You have 3 choices. You can load the member directory from the
TVPBC website, you can load it from a Pickleball Den™ database extract file, or you can download
it from John B's web site and load it that way.
If you load it from the TVPBC website, you will need to enter the TVPBC website password.
To load the member directory from a Pickleball Den database extract, you will have to first obtain a database
extract file from the club's IT group.
You may also download it from John B's website. To use this option, select "Extract from JB's Website" and
click the Download button. This will lauch the website in your browser. You will be prompted to enter a user
name and password. You must get this logon information from John B. Only people with the logon information will
be allowed to download from John B's website. Once you download the file, you can proceed in the program
to enter the file name of the downloaded file.
The recommended source of the member directory is the TVPBC website. Once you select the member
directory source, you click the "Load Member Directory" button to continue. This will bring you to
the main screen.
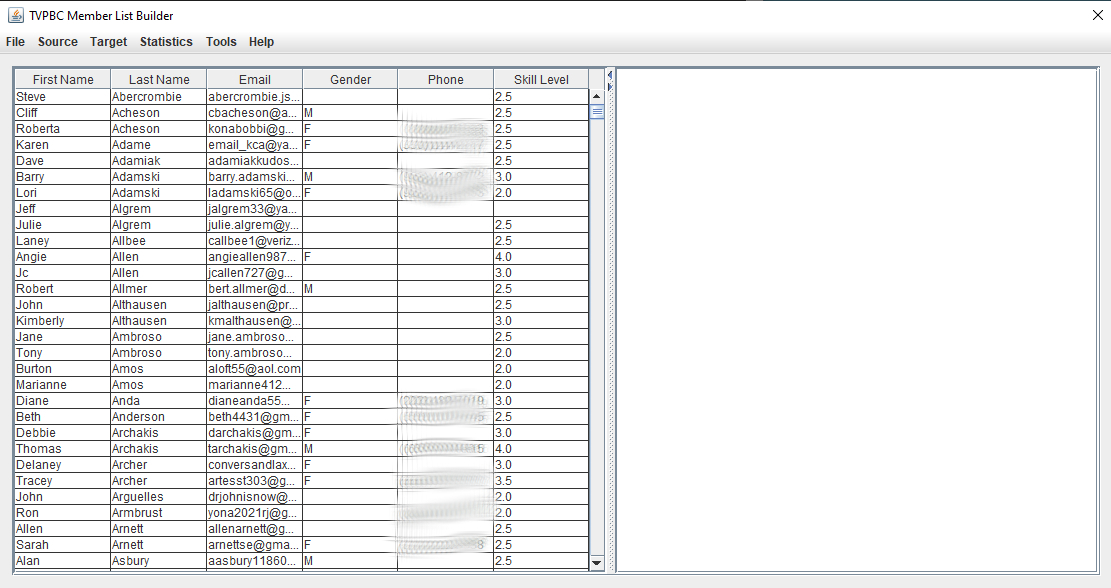
Main Screen - Member List Builder
The main screen is where you can do various things with club member information. This is
referred to as the member list builder screen.
For example, you can generate a sub-list of members based on the TVPBC member directory.
When the main screen appears, you will see two viewing panes. The left pane will be populated with
a list of club members from the member directory. The right pane is the target member list. The target
list is for your custom member lists.
While the source pane is initially populated with members from the member directory, you can also
load that pane with a custom list of your choosing. The source pane is always considered the source
of member information for copying to the target pane.
For either the source or target pane, you can sort the members by clicking on a column heading.
Clicking once will sort in ascending order; clicking a second time will sort in descending order.
Member List Builder Menu Options
Source->From Member Directory
This tells the program that you wish to view the TVPBC member directory in the source pane. This is
the default setting when you start up the program.
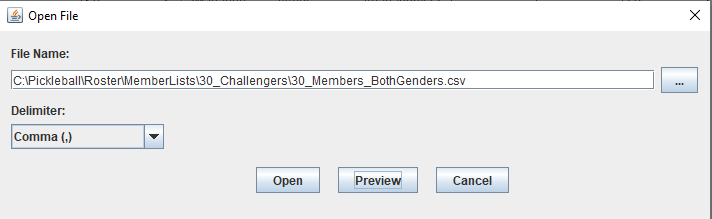
Source->From File
This tells the progam that you wish to view a member list file that you've created. Member list files
are delimited text files containing member information. At a minimum, the file must contain
First Name, Last Name and Email. When you select your file name, you will also be prompted to specify
the delimiter character used in the file.
When you select the file you wish to import, you will have an opportunity to preview the file contents.
The preview will show up to the first 10 records of the file, and will also attempt to detect the
delimiter character being used by the file. You can choose to use the delimiter that was automatically
detected.
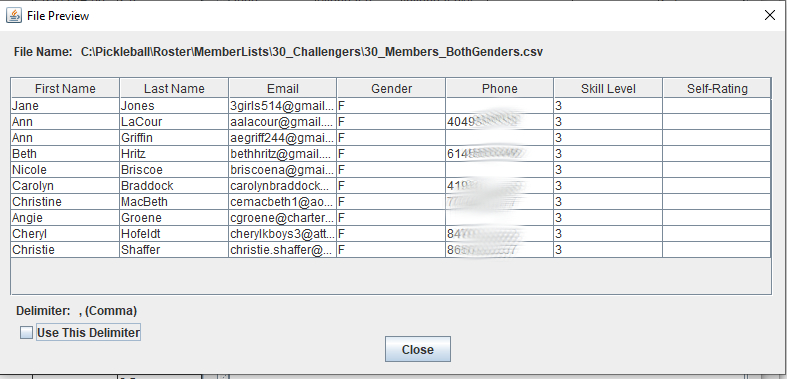
The first line of the text file must contain the names of the columns that will be present in the file.
The following names are allowed, and the first 3 are required:
- First Name
- Last Name
- Email
- Gender
- Phone
- Skill Level
Each column (field) in the file must be separated by a delimiter character. Valid delimiter characters
are: Comma(,), Semicolon(;) and TAB.
Sample file contents (using a comma as the delimiter):
	First Name,Last Name,Email

	John,Doe,jdoe@gmail.com
Source->From Clipboard
This tells the program that you wish to populate the source pane with members from your system's clipboard.
The format of the text from the clipboard is similar to that of a file, except that the columns are
always separated by TAB characters. If you are a club manager, you can use this feature to import
members from Pickleball Den™.
Source->Select All
This selects all of the members listed in the source pane. You can also use the keyboard shortcut: CTRL-A
on a PC, Control-A on an Apple Mac™.
Source->Deselect All
This de-selects all members in the source pane.
Source->Copy Selected to Target
This copies all members selected in the source pane to the target pane. If the target pane is empty,
the target pane's headings will first be set to match the headings from the source pane.
You can also use the keyboard shortcut: CTRL-T on a PC, Control-T on an Apple Mac™.
Note: You can also use your mouse to drag the selected members to the target pane.
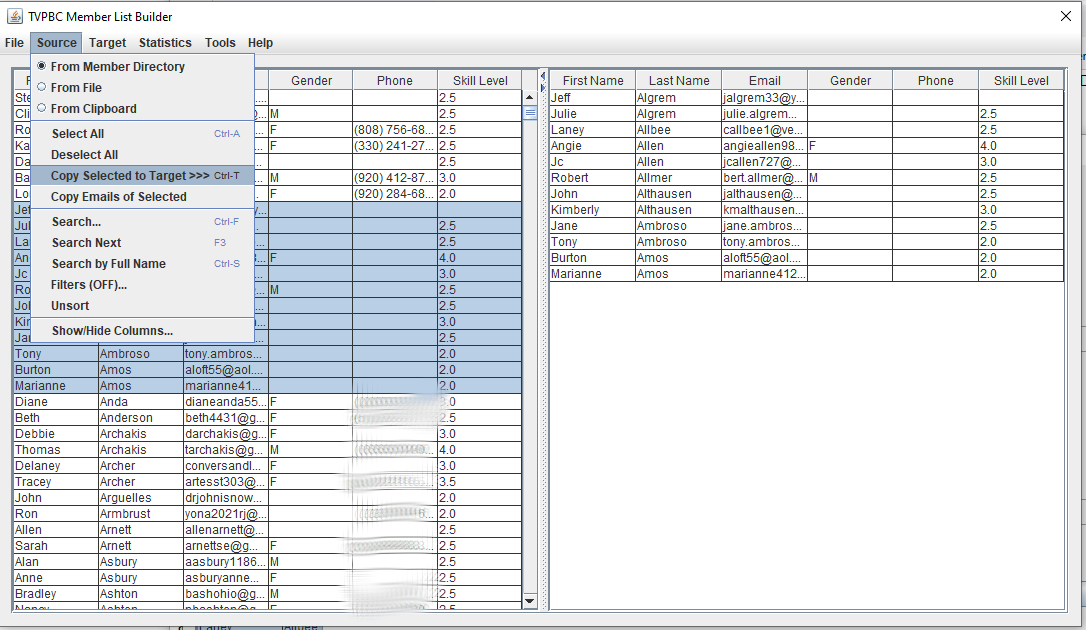
Source->Copy Emails of Selected
This copies the email addresses of the selected members to the clipboard. When asked "Is this for emails?",
select Yes if using the emails for emailing; select No if exporting to a Pickleball Den signup sheet.
If emailing, the email addresses will be separated by a semicolon(;). These can then be pasted into the "To:"
field of an email, using your preferred email program. If exporting to a Pickleball Den signup sheet,
follow the instructions under
Exporting to Pickleball Den signup sheet
Source->Send Emails to Selected Members
This will allow you to send emails to the currently selected members. A new window will open, and you'll have the
opportunity to fill in an email subject and body.

The screen will show all of the recipients of the email. You can enter a subject and body for the email, or elect to
compose that in your default email app.
Maximum Recipients per Email
If you know the maximum limit of recipients for a single email on your mail
server, you should fill that value in. The default is 100. If the number of recipients exceeds that amount,
the program will automatically break up the email request into multiple emails.
Use BCC for Recipients
Select the checkbox for using BCC if you don't want recipients to see the other recipients.
Compose Email in Default Email App
Select this if you want to use your email app to enter the subject and body.
Source->Search
You will be prompted for the search text. Click OK to perform the search. The first occurrence of
a match will move the cursor to the member matching the search text. You can do repeated searches of
the same text by selecting Source->Search Next (F3 shortcut on Windows, or Fn-F3 on an Apple Mac™).
Source->Search Next
This will repeat a search based on the text entered when you chose Source->Search.
Source->Search by Full Name
This will search for an exact match using the member's full name.
Source->Filters
This allows you to filter the members in the source pane using various conditions.
When you select this option, you will be presented with a window where you can enter your filtering
conditions. This window presents you with 3 columns: The column you wish to filter on, the type of
condition you wish to test, and the value to test for:
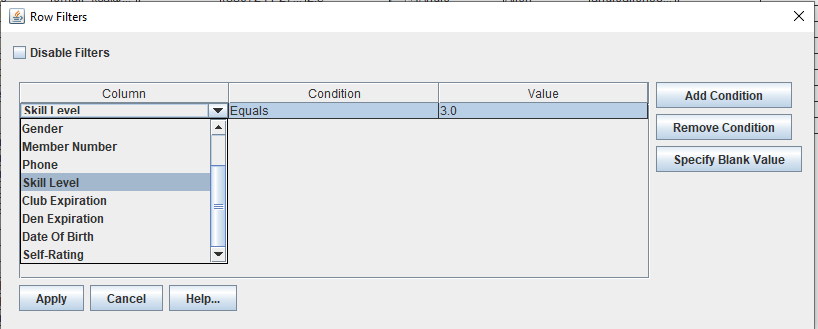
	Column - The name of the column you are testing values for
	Condition - The type of test:
		Equals: The field contents must equal the specified value
		Not equal to: The field contents must not equal the specified value
		Contains: The field contents contains the specified value (partial match)
		Does not contain: The field contents do not contain the specified value
		Starts with: The field content begins with the specified value
		Ends with: The field contents ends with the specified value
		Any of: The field content matches any of the specified values; Values
			are separated by commas, e.g., M,F
	Value - The value to test for.  If the condition is "Any of", you can designate multiple values
		by separating each with a comma.  If you wish to test for a blank value, click the
		"Specify Blank Value" button.  Values are not case-sensitive, so capitalization does not
		matter.  E.g., "John" and "john" are considered the same.
You can test for multiple conditions by clicking the "Add Condition" button. If you select multiple
conditions, then each condition must be met for the member to be displayed.
To enable filtering, un-check the "Disable Filters" checkbox. Checking the "Disable Filters"
checkbox will disable filtering, but retain any of the conditions you've entered in case you
want to re-apply the same conditions.
Source->Unsort
This removes any sorting of the members if you've sorted the list. The list order will return to
its original order.
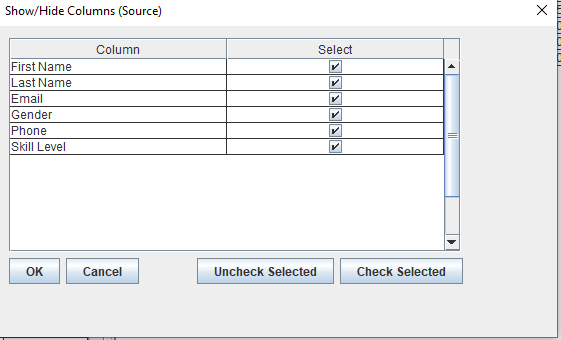
Source->Show/Hide Columns
This allows you to specify which columns you wish to view. When you select this option, a window
will appear listing all possible columns. For each column name, you can check or uncheck the
checkbox next to it to specify whether to display that column. Note that the list of columns may
be larger than those initially displayed. You can ignore the column names that are not actually
available for the file you are viewing.
Source->Find Duplicate Names
This will search for duplicate member names, and display the names and associated email addresses.
The target menu allows you to manipulate your target member list, and to save it for later use.
Target->New
This option allows you to start a new target list. The target pane will be cleared, and the column
headings set to the same headings as the source pane.
Target->Save to File
This option allows you to save your target list to a file. You will be prompted to specify a file
name and a delimiter character to separate the fields for the members. The first line of the file
that is created will contain the names of the columns. Comma-separated text files with a .CSV
extension can be loaded directly into Microsoft Excel™, or Numbers™ on an Apple Mac™
Target->Save to Clipboard
This option copies your target list to your computer's clipboard. You can use this feature to import
your list into programs like Microsoft Excel™, Numbers™ on an Apple Mac™,
or Pickleball Den™.
Important: If you are planning to export your list into Pickleball Den™, It is
recommended that you only export the minimum number of fields: First Name, Last Name, and Email.
You also need to select No when asked to copy column headings if you're exporting to Pickleball Den.
The PDen website specifies the following order of columns:
First Name
Last Name
Email
*Gender - M for male or F for female
*Phone # (10 digits)
*Date of Birth (mm/dd/yyyy)
*Representing (club or organization)
Target->Import Players
This allows you to import players using either email addresses or player names, from the clipboard.
Target->Select All
Selects all members in the target list.
Target->Unselect All
Unselects all members in the target list.
Target->Remove Selected
Removes all selected members from the target list. You can also use the keyboard shortcut: CTRL-R
on a PC, Control-R on an Apple Mac™.
Target->Copy Emails of Selected
This copies the email addresses of the selected members to the clipboard. When asked "Is this for emails?",
select Yes if using the emails for emailing; select No if exporting to a Pickleball Den signup sheet.
If emailing, the email addresses will be separated by a semicolon(;). These can then be pasted into the "To:"
field of an email, using your preferred email program. If exporting to a Pickleball Den signup sheet,
follow the instructions under Exporting to Pickleball Den signup sheet
Target->Show/Hide Columns
This allows you to specify which columns you wish to view. When you select this option, a window
will appear listing all possible columns. For each column name, you can check or uncheck the
checkbox next to it to specify whether to display that column. Note that the list of columns may
be larger than those initially displayed. You can ignore the column names that are not actually
available for the file you are viewing.
If you are planning to export to Pickleball Den™, There are two other options for selecting
the columns. The "PDen Minimum" button will select only the minimum number of columns required
to import into Pickleball Den™. The "PDen Full" button will select all possible columns that
Pickleball Den™ supports.
Target->Unsort
This removes any sorting of the members if you've sorted the list. The list order will return to
its original order.
Statistics->TVPBC Member Statistics
This will open a window showing statistics for the TVPBC member directory such as total number of
members, and a breakdown of member counts by gender and skill level.
Tools->View Clipboard Contents
This option opens a window showing the current contents of your system's clipboard.
Tools->Fix Blank Gender (Target)
This option allows you to fill in the gender for members that have no gender specified. It uses an
algorithm based on the member's first name to determine the most likely gender. The algorithm is
fairly accurate for first names, and is based on census data from the U.S., Canada, Australia, and
the U.K. for about 130,000 names. This option will modify your target list, so you should use it with caution.
Tools->Copy Skill Level from Member Directory
This option allows you to fill in blank skill levels by pulling the skill level from the TVPBC member directory.
This will modify your target list. This can be useful if your list is from a sub-club, and doesn't have skill
levels assigned for that sub-club.
Additional Features
Viewing Member Profiles
You can double-click on a member to see their profile information in a separate window. You will
also be able to copy the member's email address, phone number, or member number to the clipboard.
Right-Click on Source Pane
If you right-click on the source pane, you will get a popup menu. Current choices are:
Copy Selected to Target, Show Member Profile, Source Statistics, Copy Emails of Selected.
Right-Click on Target Pane
If you right-click on the target pane, you will get a popup menu. Current choices are:
Remove Selected, Show Member Profile, Target Statistics, Copy Emails of Selected.
Importing from Pickleball Den
To import from PDen, go into your Pickleball Den club, then:
- Click on the dropdown for Members
- Select "Manage Members"
- Select "Export Members"
- Make sure the correct club or clubs is selected
- Click "Export"
- Click "Copy"
In the program, do the following:
- Select Source->From Clipboard
You should see the imported members displayed in the source pane!
Exporting to a Pickleball Den Member List
To export to a Pickleball Den club's member list:
- In the program, select Target->Save to Clipboard.
- Click on the "PDen Minimum" button
- Click OK
- In Pickleball Den, select "Manage Members" for your club
- Select "Import Members"
- Make sure your club is selected
- Click in the box that says "Copy & Paste your tab delimited text here"
- Paste the text
- Click Import
To export to a Pickleball Den signup sheet:
- In the program, select either Source->Copy Emails of Selected, or Target->Copy Emails of Selected
- When asked "Is this for emails?", select No"
- In Pickleball Den, go into the desired signup sheet
- Select "Import Players"
- Paste the text from the clipboard
- Click Import
